Free Statistics

of Irreproducible Research!

Author's title

Author*The author of this computation has been verified*
R Software Modulerwasp_cloud.wasp
Title produced by softwareTrivariate Scatterplots
Date of computationMon, 10 Nov 2008 03:41:18 -0700
Cite this page as followsStatistical Computations at FreeStatistics.org, Office for Research Development and Education, URL https://freestatistics.org/blog/index.php?v=date/2008/Nov/10/t12263138191mxb691byp46hc9.htm/, Retrieved Mon, 20 May 2024 03:01:08 +0000
Statistical Computations at FreeStatistics.org, Office for Research Development and Education, URL https://freestatistics.org/blog/index.php?pk=22919, Retrieved Mon, 20 May 2024 03:01:08 +0000
QR Codes:

Original text written by user:
IsPrivate?No (this computation is public)
User-defined keywords
Estimated Impact195
Family? (F = Feedback message, R = changed R code, M = changed R Module, P = changed Parameters, D = changed Data)
F       [Trivariate Scatterplots] [Various EDA Topic...] [2008-11-10 10:41:18] [dafd615cb3e0decc017580d68ecea30a] [Current]
Feedback Forum
2008-11-14 11:01:31 [Tamara Witters] [reply
De student heeft enkel de Bivarlate kernel density grafieken besproken bij deze methode.
Trivariate Scatterplots:
Deze R-module biedt veel voordelen. Het maakt verschillende berekeningen in 1 keer met o. a de Bivarlate kernel density.
Je krijgt eerst 3 vierkanten te zien die telkens het verband tussen 3 variabelen weergeven. Het nadeel hiervan is dat je de afstand tussen de punten niet goed kan inschatten.
Vervolgens is er het 2-dimensioneel scatterplot. Je kan hieruit afleiden of een variabele een normaalverdeling heeft en of er correlatie is tussen de verschillende variabelen. Het 3e (2e rij) kadertje bijvoorbeeld geeft het verband weer tussen 'vervaardiging machines en apparatuur met..' en 'vervaardiging elektriche app met..', we kunnen zien dat er een grote correlatie bestaat want de punten liggen dicht bij elkaar en op 1 lijn. Hoe dichter de punten hoe groter de waarschijnlijkheid. Het nadeel van deze methode is dat je een vertekend beeld kan krijgen.
2008-11-20 13:26:02 [Glenn De Maeyer] [reply
De kubussen geven ons eerst een driedimensionale voorstelling van de tijdreeksen. We moeten hier echter mee opletten. Welke positie je ook bekijkt dit geeft een vertekend beeld. Want telkens je een andere invalshoek van dit driedimensionaal beeld neemt reduceer je de dimensie, waardoor bijvoorbeeld punten die achter elkaar liggen niet maar zichtbaar zijn. Je moet de kubus eigenlijk in alle dimensie bekijken. Dit is niet zo handig.

Na de de kubussen krijgen we een tekening met diagonaal histogrammen van de tijdreeksen en daarboven en onder scatterplots die de verbanden aantonen. De scatterplots zijn eigenlijk projecties van de vorige kubussen. Het zou dus kunnen dat je met een vertekend beeld zit en dat indien je een 3e dimensie toevoegt dat je dan een ander beeld krijgt.

Als laatste krijgen we een bivariate Kernel density plot. Deze vergelijkt de punten van gelijke dichtheid met elkaar. Het rode gebied toont ons de hoogste correlaties. De 3e dimensie wordt hier weergegeven door hoogtelijnen.
2008-11-22 09:35:52 [Jeroen Michel] [reply
Hier is niet echt een bespreking gegeven. Hierbij werd verwezen naar het 1ste deel van de vraag (ook dit komt in deze vraag terug).

Voorts worden er 3d- en 2d modellen weergegeven. Bij de 3d-modellen is het zeer moeilijk in te schatten hoe de verschillende van elkaar liggen. Afhankelijk van de dimmensie zijn de punten vaak niet achter elkaar waar te nemen. Dit is dus niet zo handig om te gebruiken.

Het 2d-model daarentegen is iets handiger. Hier kan je afleiden of er een normaalverdeling is af te leiden en hoe de correlatie is tussen de verschillende variabelen.

Post a new message
Dataseries X:
132.7
132.7
132.8
132.4
131.5
131
130.7
130.1
129.1
128
127
126
125
123.7
122.1
120.2
118.5
117.2
116.2
115.1
113.8
112.7
111.8
111.2
110.6
109.7
108.6
107.8
107.5
107.5
107.4
107.2
107.1
107.2
107.5
107.9
108.4
108.8
109
109
109
108.8
108.4
108.1
107.8
107.3
106.6
105.9
105.4
105.4
105.6
105.6
105.6
105.7
105.6
105.4
105.4
105.5
105.7
105.8
Dataseries Y:
151.3
151.2
150.8
149.9
148.9
148
146.8
145.3
144.1
143.1
142
140.8
138.9
136.2
133.4
130.7
128.5
126.9
125.8
124.6
122.7
120.9
119.3
118
117
115.9
115.1
114.7
114.1
113.3
112.7
112.3
112.1
112.1
111.9
111.6
111.3
110.9
110.7
110.8
110.6
110
109.1
108.9
108.9
108.2
107
106
105.2
104.4
103.9
103.4
103
102.6
101.8
100.7
99.9
99.9
100.6
101
Dataseries Z:
98.5
97.9
96.2
93.7
93
93.6
93
92.1
91.4
90.3
90.3
91.6
92.4
93
93
91.9
91.6
93.2
94.4
94.2
93.6
93
92.3
91.4
90.5
89.1
87.4
86.7
87.4
89.4
90.5
88.5
85.3
83.6
83.9
85
85
84.2
83.8
83.6
84.2
86
88
89.4
89.6
88.4
86.1
84.5
84.7
86.1
87.3
87.4
86.6
85.3
84.1
84.8
86
86.8
88.2
89.6


Summary of computational transaction
Raw Inputview raw input (R code)
Raw Outputview raw output of R engine
Computing time3 seconds
R Server'Gwilym Jenkins' @ 72.249.127.135

\begin{tabular}{lllllllll}
\hline
Summary of computational transaction \tabularnewline
Raw Input & view raw input (R code)  \tabularnewline
Raw Output & view raw output of R engine  \tabularnewline
Computing time & 3 seconds \tabularnewline
R Server & 'Gwilym Jenkins' @ 72.249.127.135 \tabularnewline
\hline
\end{tabular}
%Source: https://freestatistics.org/blog/index.php?pk=22919&T=0

[TABLE]
[ROW][C]Summary of computational transaction[/C][/ROW]
[ROW][C]Raw Input[/C][C]view raw input (R code) [/C][/ROW]
[ROW][C]Raw Output[/C][C]view raw output of R engine [/C][/ROW]
[ROW][C]Computing time[/C][C]3 seconds[/C][/ROW]
[ROW][C]R Server[/C][C]'Gwilym Jenkins' @ 72.249.127.135[/C][/ROW]
[/TABLE]
Source: https://freestatistics.org/blog/index.php?pk=22919&T=0

Globally Unique Identifier (entire table): ba.freestatistics.org/blog/index.php?pk=22919&T=0

As an alternative you can also use a QR Code:  

The GUIDs for individual cells are displayed in the table below:

Summary of computational transaction
Raw Inputview raw input (R code)
Raw Outputview raw output of R engine
Computing time3 seconds
R Server'Gwilym Jenkins' @ 72.249.127.135


Parameters (Session):
par1 = 50 ; par2 = 50 ; par3 = Y ; par4 = Y ; par5 = verv. prod. metaal ; par6 = verv. mach. en app. met. ; par7 = verv. elek. app. uit met. ;
Parameters (R input):
par1 = 50 ; par2 = 50 ; par3 = Y ; par4 = Y ; par5 = verv. prod. metaal ; par6 = verv. mach. en app. met. ; par7 = verv. elek. app. uit met. ;
R code (references can be found in the software module):
x <- array(x,dim=c(length(x),1))
colnames(x) <- par5
y <- array(y,dim=c(length(y),1))
colnames(y) <- par6
z <- array(z,dim=c(length(z),1))
colnames(z) <- par7
d <- data.frame(cbind(z,y,x))
colnames(d) <- list(par7,par6,par5)
par1 <- as.numeric(par1)
par2 <- as.numeric(par2)
if (par1>500) par1 <- 500
if (par2>500) par2 <- 500
if (par1<10) par1 <- 10
if (par2<10) par2 <- 10
library(GenKern)
library(lattice)
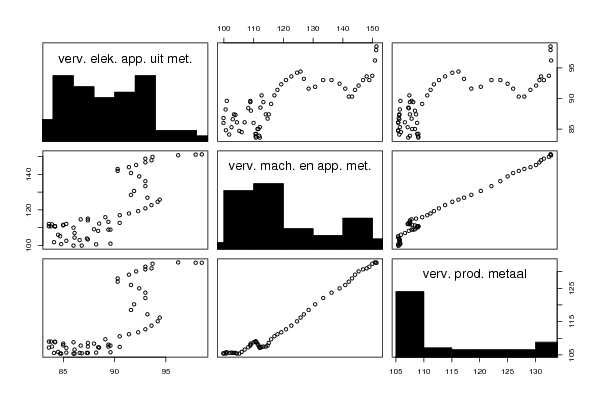
panel.hist <- function(x, ...)
{
usr <- par('usr'); on.exit(par(usr))
par(usr = c(usr[1:2], 0, 1.5) )
h <- hist(x, plot = FALSE)
breaks <- h$breaks; nB <- length(breaks)
y <- h$counts; y <- y/max(y)
rect(breaks[-nB], 0, breaks[-1], y, col='black', ...)
}
bitmap(file='cloud1.png')
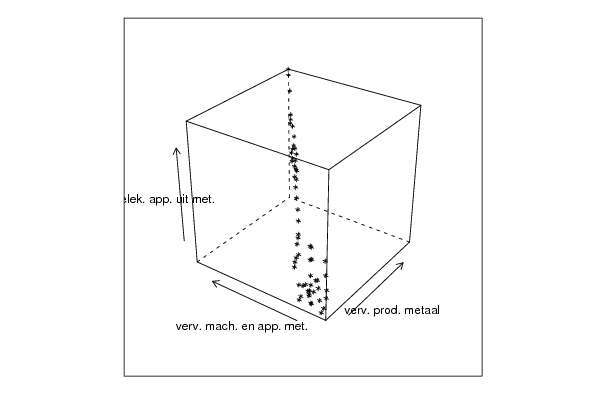
cloud(z~x*y, screen = list(x=-45, y=45, z=35),xlab=par5,ylab=par6,zlab=par7)
dev.off()
bitmap(file='cloud2.png')
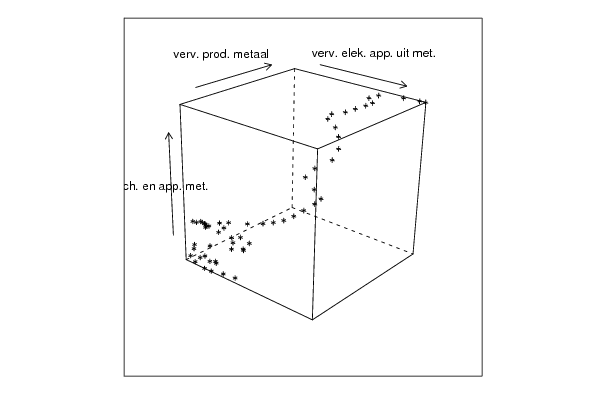
cloud(z~x*y, screen = list(x=35, y=45, z=25),xlab=par5,ylab=par6,zlab=par7)
dev.off()
bitmap(file='cloud3.png')
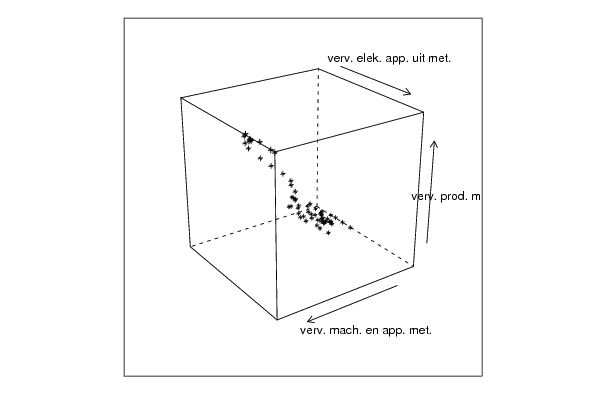
cloud(z~x*y, screen = list(x=35, y=-25, z=90),xlab=par5,ylab=par6,zlab=par7)
dev.off()
bitmap(file='pairs.png')
pairs(d,diag.panel=panel.hist)
dev.off()
x <- as.vector(x)
y <- as.vector(y)
z <- as.vector(z)
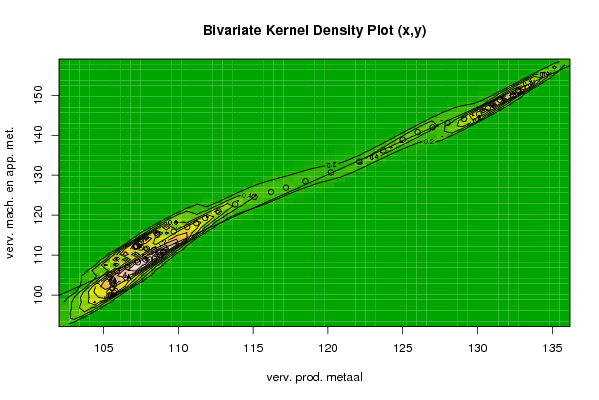
bitmap(file='bidensity1.png')
op <- KernSur(x,y, xgridsize=par1, ygridsize=par2, correlation=cor(x,y), xbandwidth=dpik(x), ybandwidth=dpik(y))
image(op$xords, op$yords, op$zden, col=terrain.colors(100), axes=TRUE,main='Bivariate Kernel Density Plot (x,y)',xlab=par5,ylab=par6)
if (par3=='Y') contour(op$xords, op$yords, op$zden, add=TRUE)
if (par4=='Y') points(x,y)
(r<-lm(y ~ x))
abline(r)
box()
dev.off()
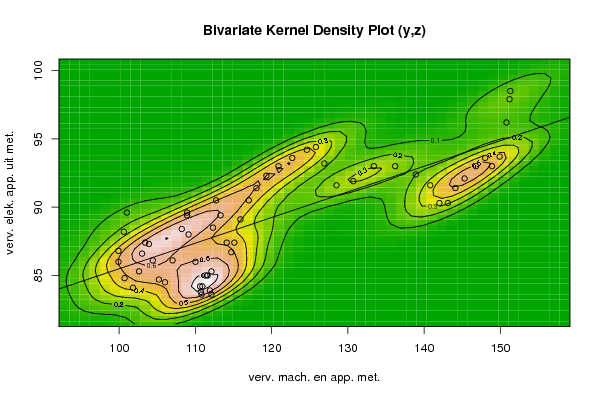
bitmap(file='bidensity2.png')
op <- KernSur(y,z, xgridsize=par1, ygridsize=par2, correlation=cor(y,z), xbandwidth=dpik(y), ybandwidth=dpik(z))
op
image(op$xords, op$yords, op$zden, col=terrain.colors(100), axes=TRUE,main='Bivariate Kernel Density Plot (y,z)',xlab=par6,ylab=par7)
if (par3=='Y') contour(op$xords, op$yords, op$zden, add=TRUE)
if (par4=='Y') points(y,z)
(r<-lm(z ~ y))
abline(r)
box()
dev.off()
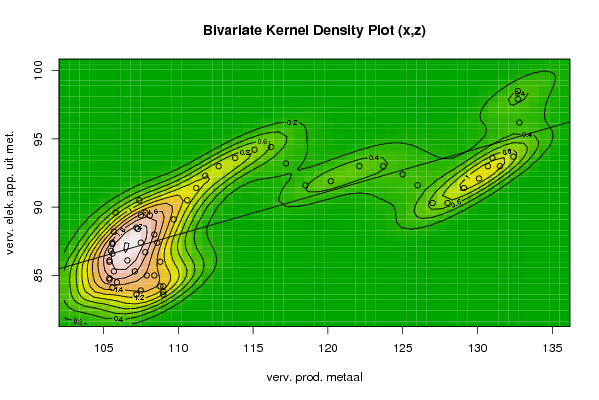
bitmap(file='bidensity3.png')
op <- KernSur(x,z, xgridsize=par1, ygridsize=par2, correlation=cor(x,z), xbandwidth=dpik(x), ybandwidth=dpik(z))
op
image(op$xords, op$yords, op$zden, col=terrain.colors(100), axes=TRUE,main='Bivariate Kernel Density Plot (x,z)',xlab=par5,ylab=par7)
if (par3=='Y') contour(op$xords, op$yords, op$zden, add=TRUE)
if (par4=='Y') points(x,z)
(r<-lm(z ~ x))
abline(r)
box()
dev.off()